Learn how to make pinwheel sandwiches, new pinwheel recipes, and all the tips and tricks to make the BEST pinwheels! If you're wondering how to make sweet, savory, baked, or cold pinwheels, you're in the right place!
Pinwheel sandwiches, also known as pinwheel wraps, party wraps, and rolled sandwiches, are popular one-bite party appetizers. They have unlimited flavor combinations, ranging from sweet to salty to savory.
Pinwheels aren't just for parties, though. They're a tasty weekend lunch, easy school lunches, and football Sunday's main meal or snack.
(Speaking of football Sunday, you need to make BBQ Pulled Pork Pizza and Sheet Pan Ground Turkey Quesadillas!)
This ultimate guide covers everything you need to know about pinwheel sandwiches! You'll learn how to make all kinds of pinwheel wraps, how to store and serve pinwheels, and expert tips and tricks.
Jump to:
- What are pinwheel sandwiches?
- Ingredients needed
- Equipment needed
- How to make pinwheel sandwiches
- Expert tips and tricks
- Recipe for the BEST ham and ranch pinwheels
- How to store pinwheel sandwiches
- When to serve sandwich pinwheels
- Food allergy substitutions
- What to serve with deli pinwheels
- FAQs
- More sandwich recipes
- How to Make Pinwheel Sandwiches - The Ultimate Guide!
- Hungry for more?
- 💬 Comments
What are pinwheel sandwiches?
Pinwheels are wraps made using tortillas, flattened slices of white bread, Crescent dough, or puff pastry. Depending on your recipe, they're layered with meat, cheese, vegetables, or fruit!
Ingredients needed
One of the reasons I love these little wraps is because they're so versatile! You can use unlimited ingredients and completely customize your pinwheels to your taste.
- Wrap: Choose your wrap. I prefer to use 10-12-inch flour tortillas. You can also use slices of white bread and premade refrigerator dough.
- Binder: This is used to bind or "glue" your wrap together. Since the wraps are cut into bite-sized slices, you must have a binding ingredient to seal the wrap. My favorite is cream cheese, but you can also use nut butter, melted cheese, and mayonnaise-based salads (like my creamy herbed chicken salad).
- Fillings: Choosing your filling is the fun part! You'll find recipes at the bottom of this post for ham and ranch cream cheese pinwheels and salami and pesto cream cheese pinwheels. Choose from other filling options such as turkey, chicken, tuna salad, egg salad, cheeses, vegetables, and creamy spreads.
Equipment needed
Fancy kitchen tools and bulky appliances aren't required to make pinwheel appetizers! A food processor will help if you make a recipe requiring finely diced ingredients, but it's not absolutely necessary!
- Cutting board and chopping knife
- Measuring cups, measuring spoons, and mixing bowls
- A rolling pin is only needed if you're making pinwheels with sandwich bread.
- You'll need a sheet pan (baking sheet) if you're making a baked pinwheel recipe, such as crescent roll pizza pinwheels.
How to make pinwheel sandwiches
Using tortilla wraps and cream cheese
- Soften the cream cheese in the microwave. You can add seasonings to the cream cheese after it's softened. Popular choices include ranch dip mix, taco seasoning, cinnamon sugar, and dried herbs and spices!
- Spread the cream cheese mixture onto the wrap. Go almost all the way to the edges!
- Layer the rest of your ingredients onto the cream cheese. You'll add deli meat, sliced cheese, fruit, and vegetables at this time.
- Tightly roll your tortilla wrap into a long, thin roll, and seal up the edges with the cream cheese.
- Repeat this process with the rest of your tortillas, cream cheese, and filling ingredients.
- Wrap the tortilla rolls tightly in plastic wrap. Store in the refrigerator for at least 1 hour before cutting into small pinwheel slices. This step cools the cream cheese back down and helps meld the ingredients together so the wraps stay tightly rolled up after cutting.
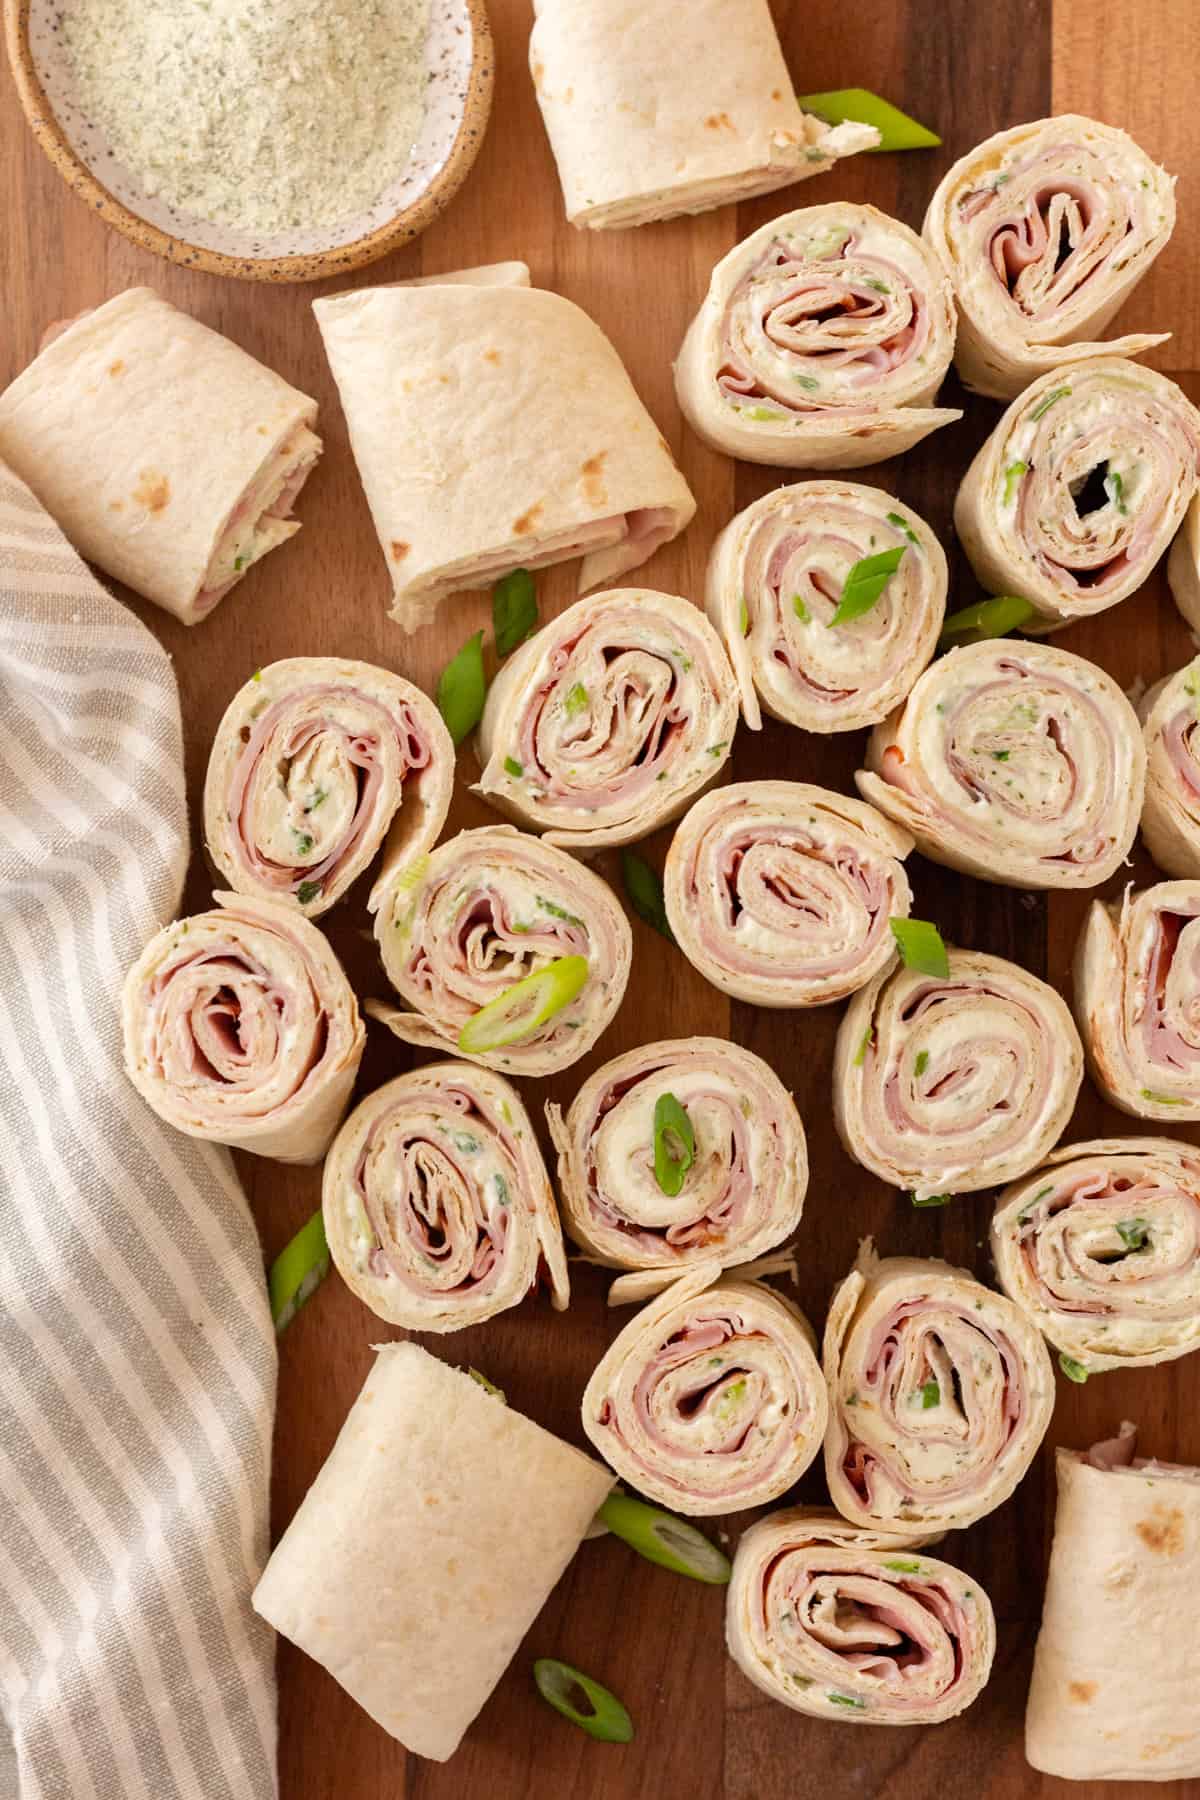
- Cut the tortillas into 1-inch thick slices to make your pinwheels!
Alternatives: Nut butter is commonly used instead of cream cheese if you're making a dessert wrap. This could be peanut butter, almond butter, or Nutella. Thanks to the mayonnaise, sour cream, or Greek yogurt, wraps with creamy filling do not need cream cheese.
Using bread
You'll need several large slices of white bread (I like to use Arnold White Bread), a rolling pin, and your filling ingredients.
- Cut off the sandwich bread crust.
- Flatten the white bread slices with a rolling pin. Roll over the top of the bread several times, making the bread completely flat.
- Layer your filling ingredients onto the flattened bread.
- Start at the bread's short edge, and tightly roll the bread slices.
- Slice into pinwheels using a clean, sharp knife.
Important tips: Choose soft bread without nuts or seeds. This type of pinwheel wrap is best with minimal ingredients. I recommend using only 1-2 fillings (including your spread). Kids love these! PB&J sandwich pinwheels are a favorite in my house!
Using crescent roll dough
Instructions will vary based on what type of toppings you choose. This is a basic overview of what to expect when making baked pinwheels with crescent dough.
- Roll the dough out into a large sheet and press any seams together.
- Evenly spread your toppings over the entire surface of the crescent roll dough.
- Starting from the long side, carefully roll the dough into a log or cylinder shape.
- Using a sharp knife, slice the log into approximately ½-inch to 1-inch thick pinwheels
- Bake according to recipe instructions.
Expert tips and tricks
- Seam side down - Place the seam side down when cutting the wraps. This is another way to ensure that your wrap doesn't fall apart when you're slicing it.
- Less equals more - Don't overdo it with your fillings! Pinwheel rolls are much harder to cut, eat, and hold together if they're stuffed full of ingredients. A few simple ingredients are perfect.
- Sharp knife - A sharp, non-serrated steak knife will give you the cleanest cut. It also helps to wipe your knife clean between slices.
- Refrigerate - Chilling the wraps in the fridge before slicing helps to hold the pinwheel pieces together.
- Toothpicks will help keep your pinwheels from opening up. I love these animal toothpicks, Christmas toothpicks, and fancy beaded toothpicks.
- Packing to go - If you plan on packing your pinwheels in a cooler for the day, I suggest waiting to cut them. They will take up less room in your cooler this way.
- Allergen-friendly - Pinwheels are easily modified for special diets! If you want to make them gluten-free, swap out the wheat-based wraps with a gluten-free wrap. For dairy-free, use non-dairy cream cheese.
- Flavor - Don't be afraid to use dried or fresh herbs and seasoning blends! Most people will eat each pinwheel slice in one single bite. This means every single bite needs to be infused with flavor!
Recipe for the BEST ham and ranch pinwheels
Detailed recipe instructions are found in the recipe card below. You'll need cream cheese, ranch dip mix, sliced deli ham, and fresh green onion.
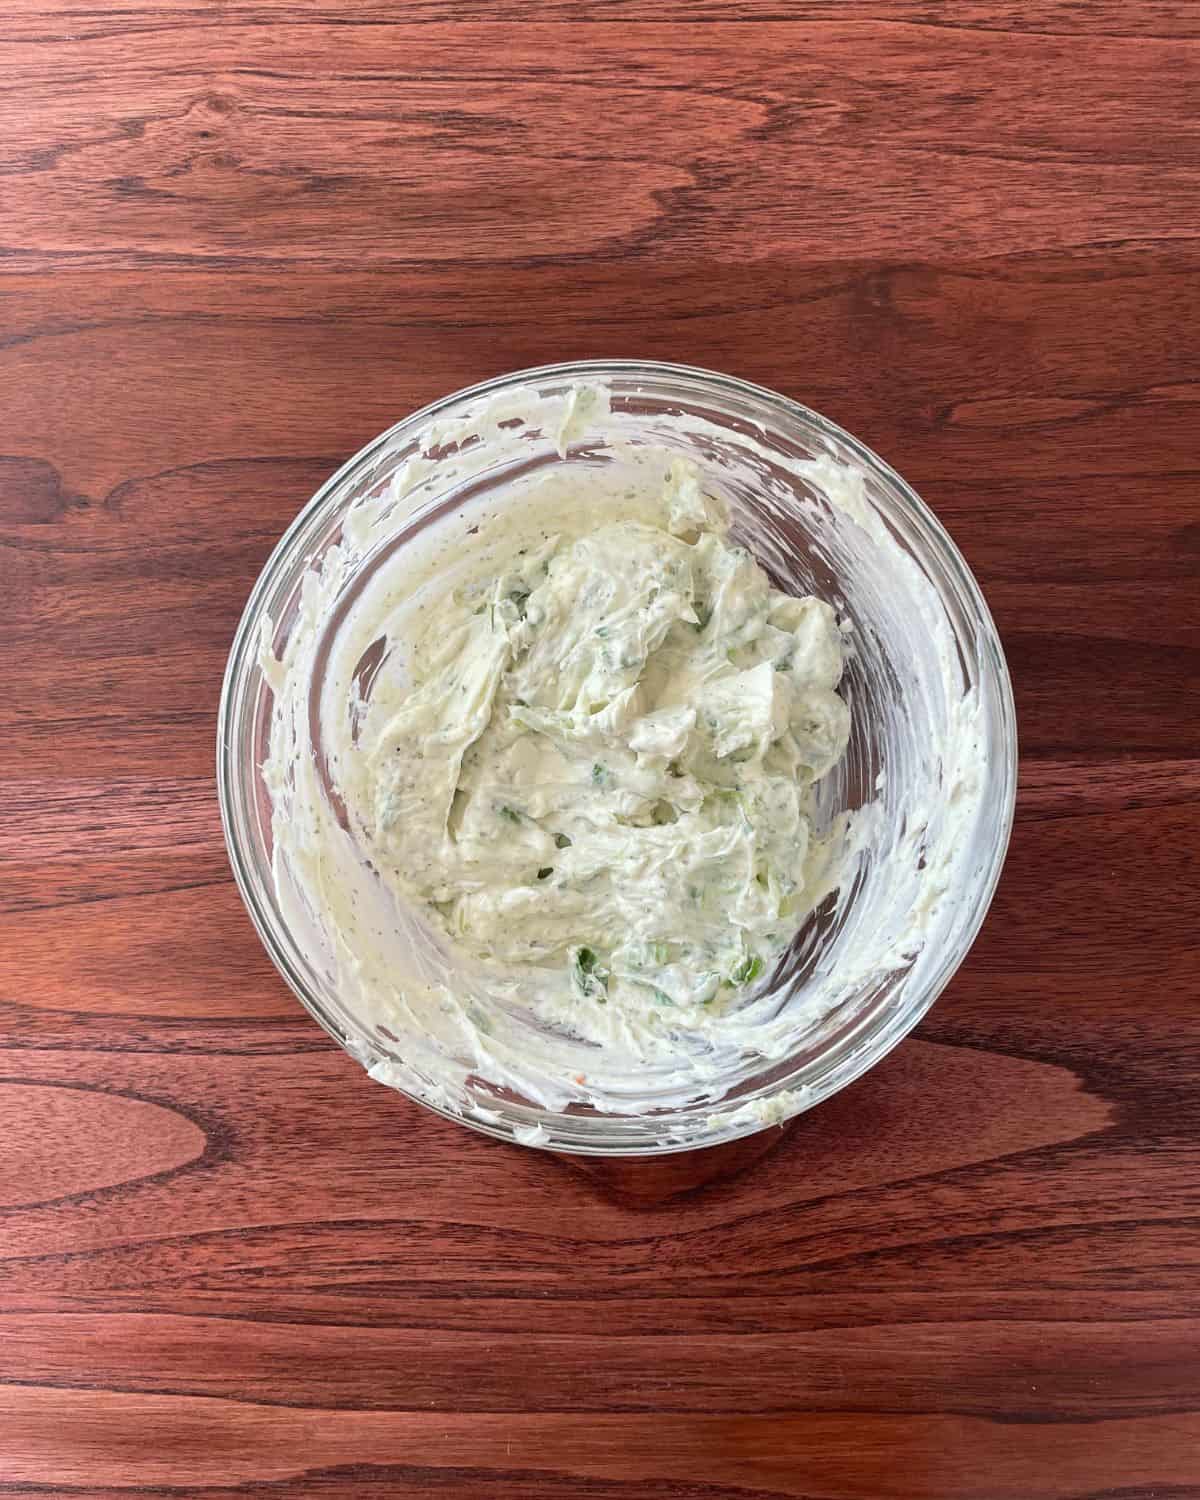
Step 1: Soften the cream cheese in the microwave, then mix ranch dip and diced green onions into the softened cheese.
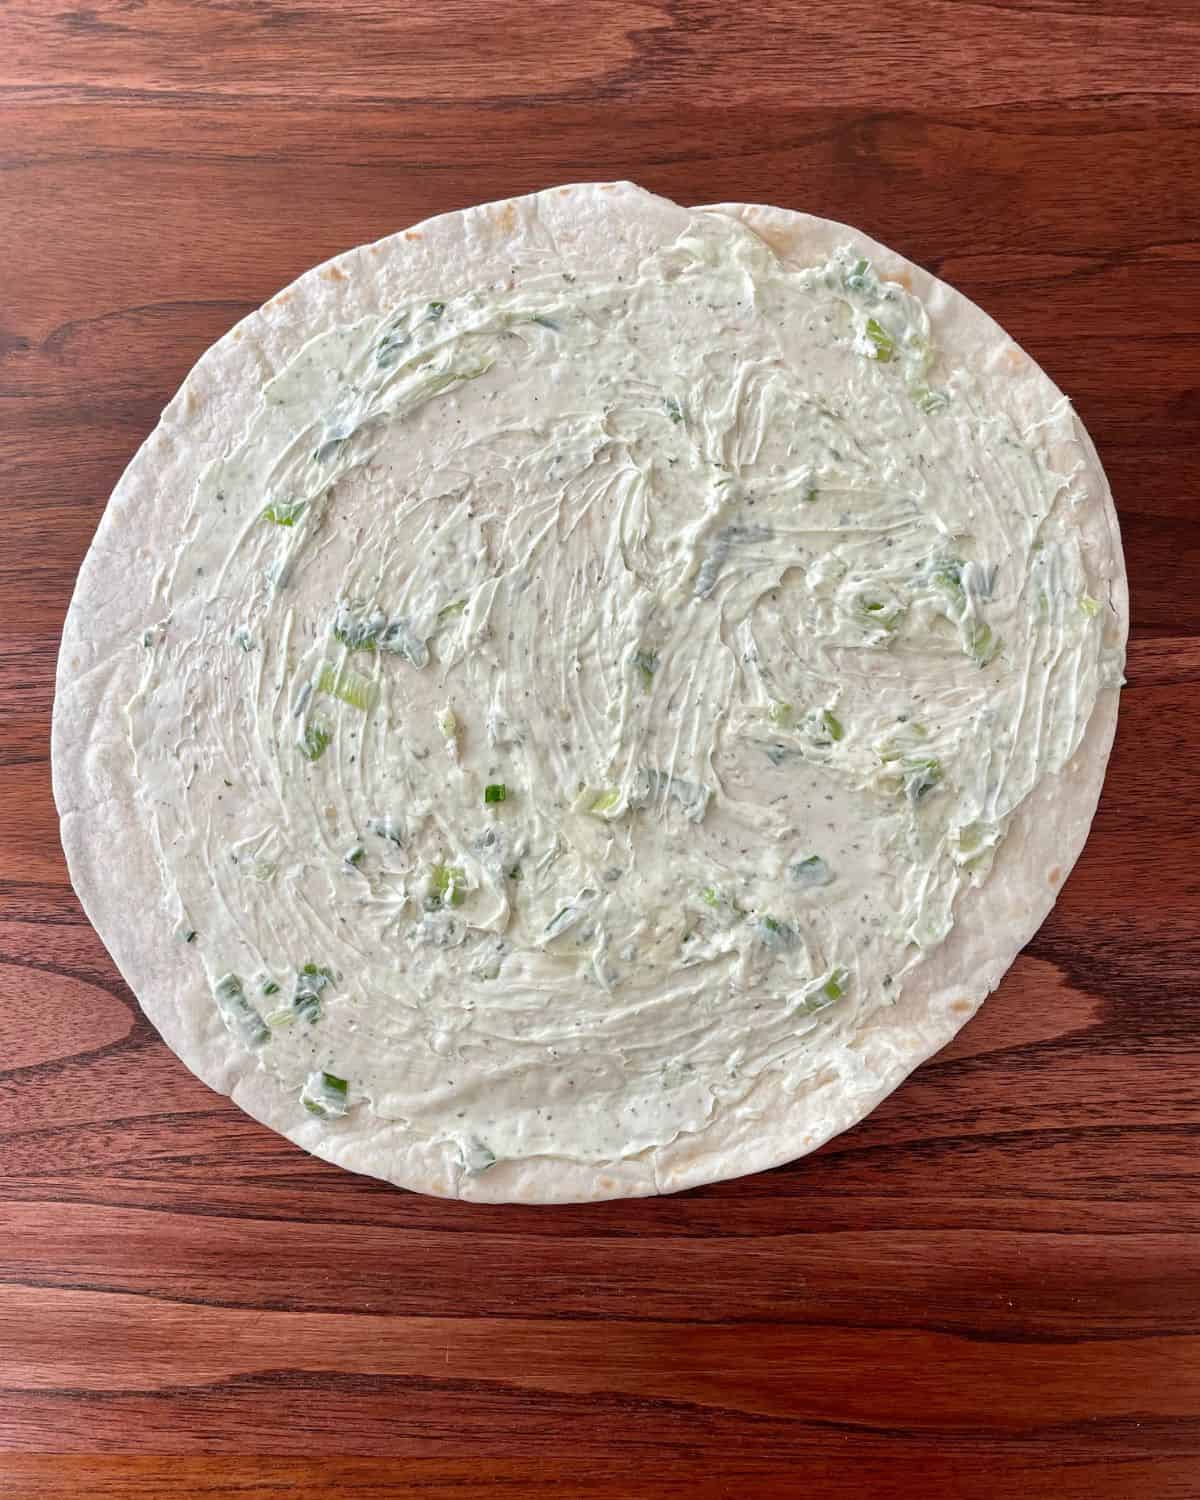
Step 2: Spread a thin layer of ranch cream cheese onto your tortilla wrap. Go almost all the way to the edges. I like to leave about 2 centimeters of open space.
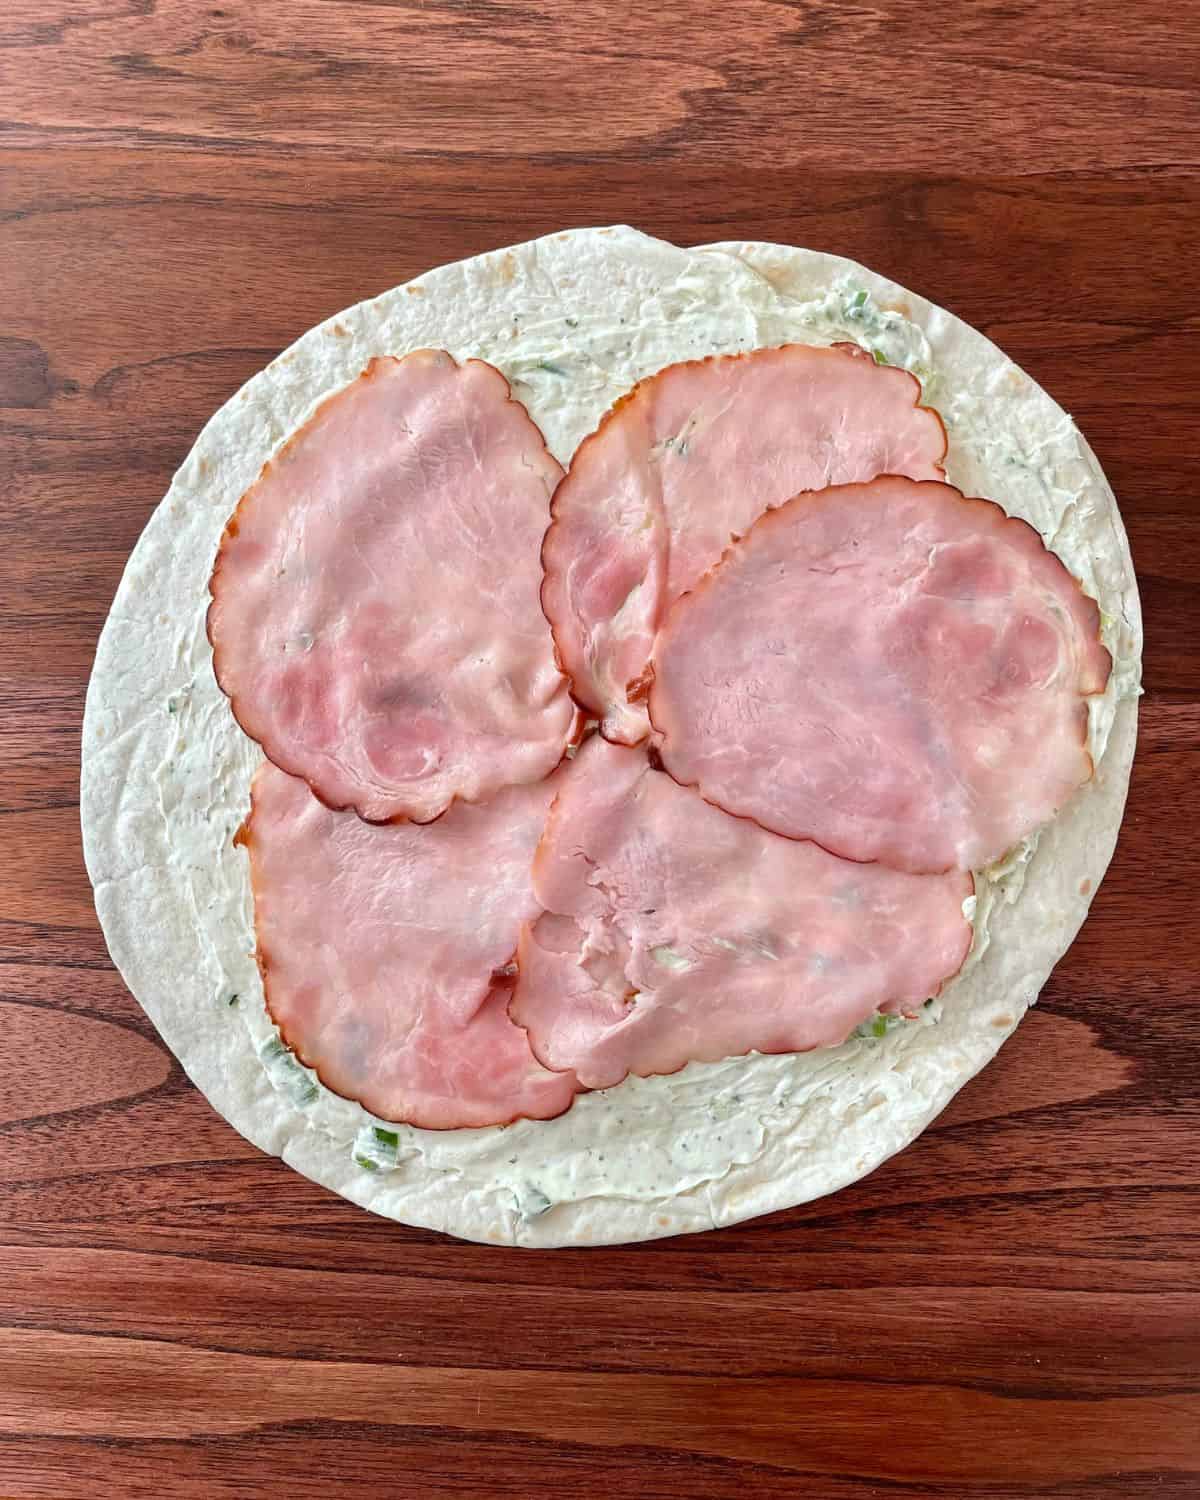
Step 3: Add a single layer of deli ham, about 3-4 thin slices.
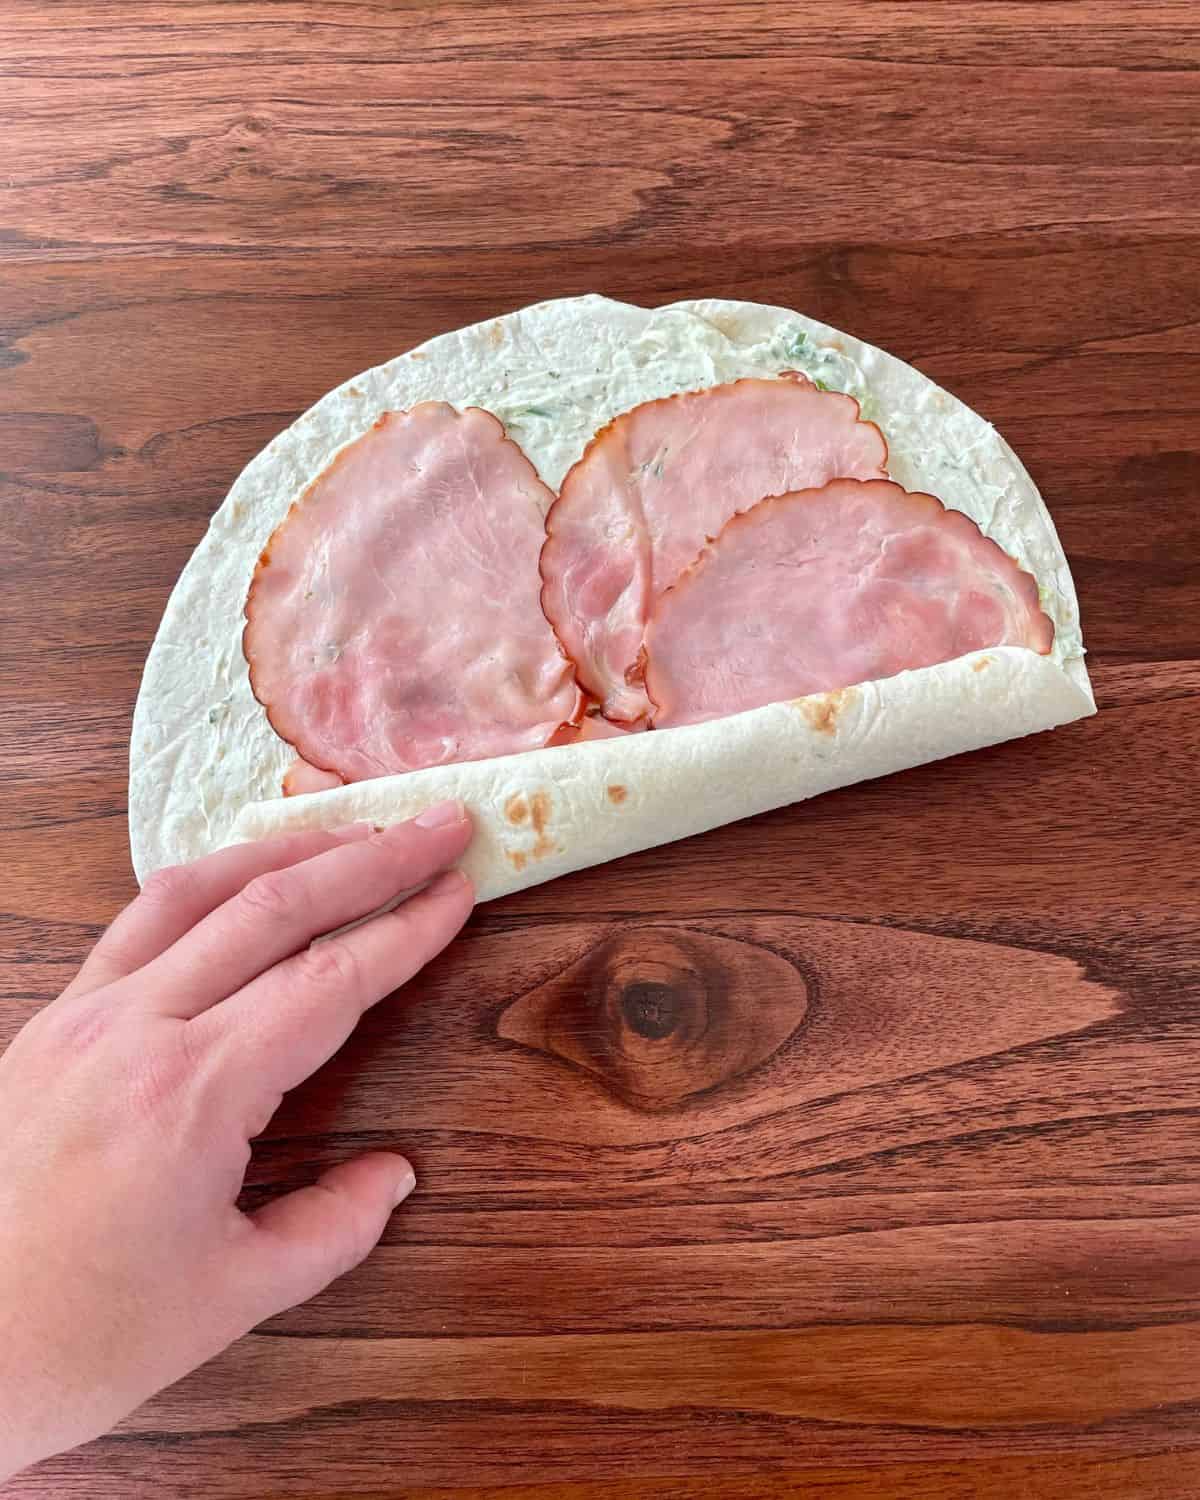
Step 4: Tightly roll the tortilla wrap from edge to edge. Repeat the above steps with the rest of your wraps!
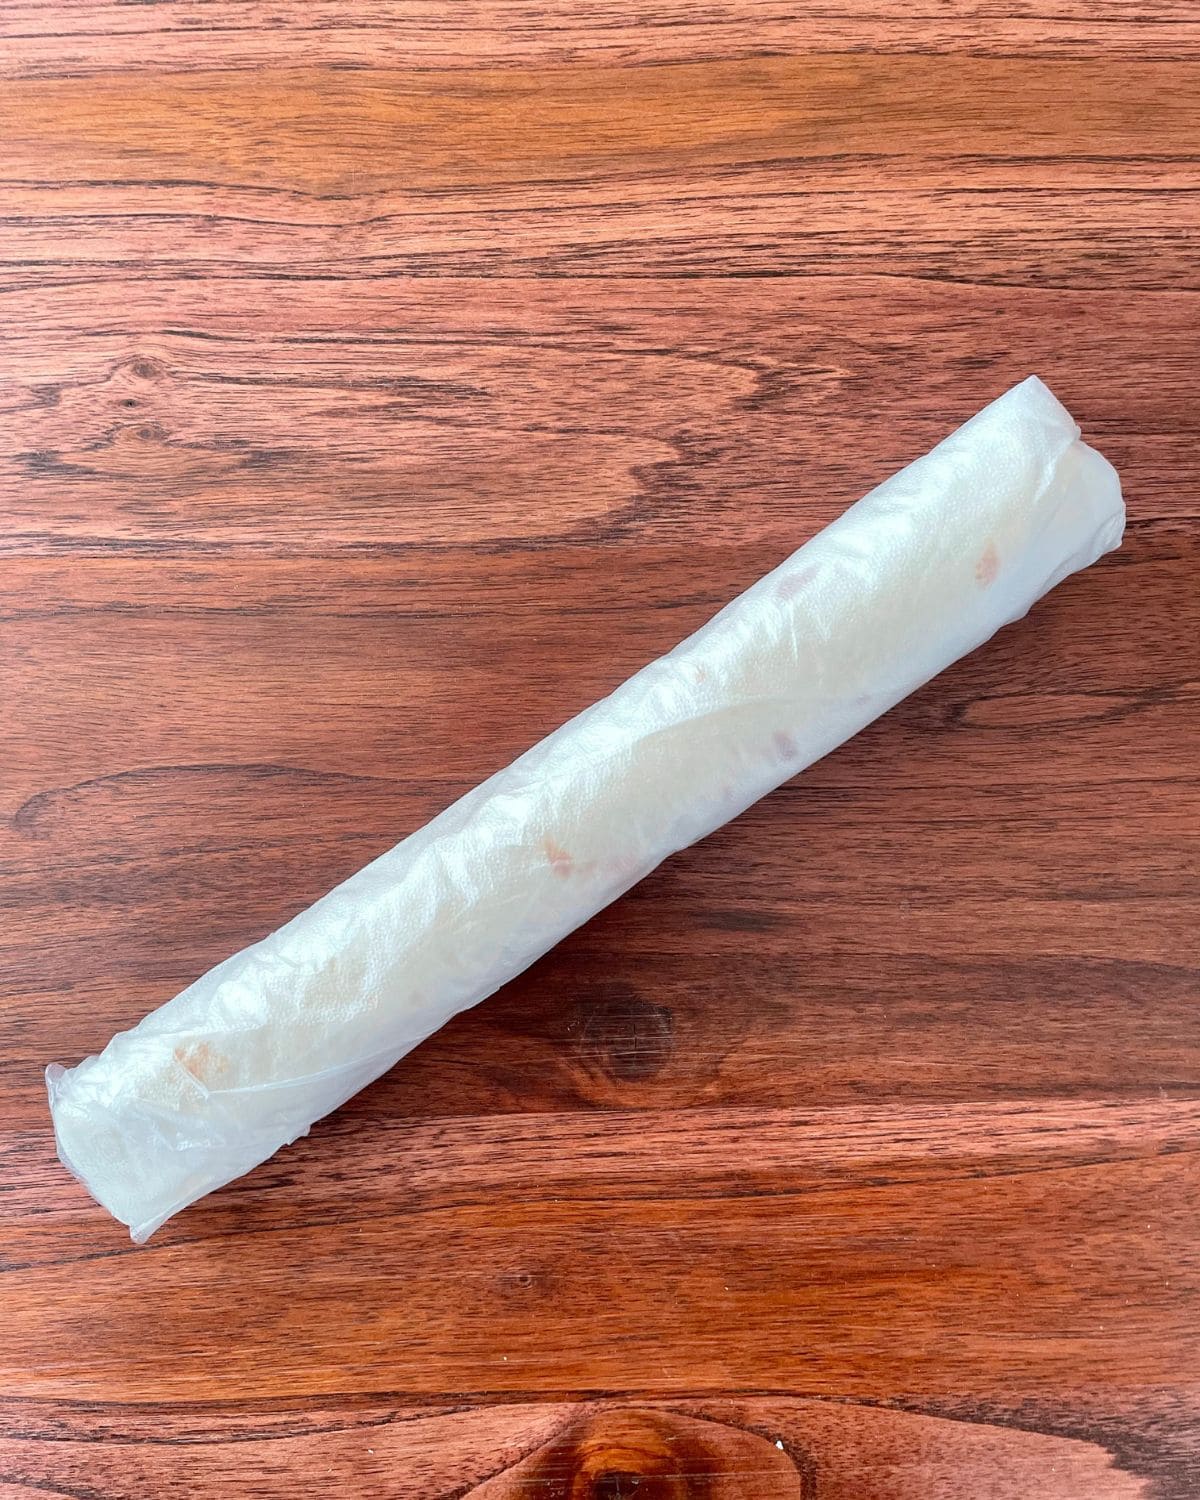
Step 5: Optional step: Wrap each tortilla tightly with plastic wrap. Transfer the tortilla rolls to the refrigerator for one hour. This step cools the cream cheese and helps blend the ingredients. You don't have to do this, but it definitely helps to hold the pinwheels together and allows the flavors to meld.
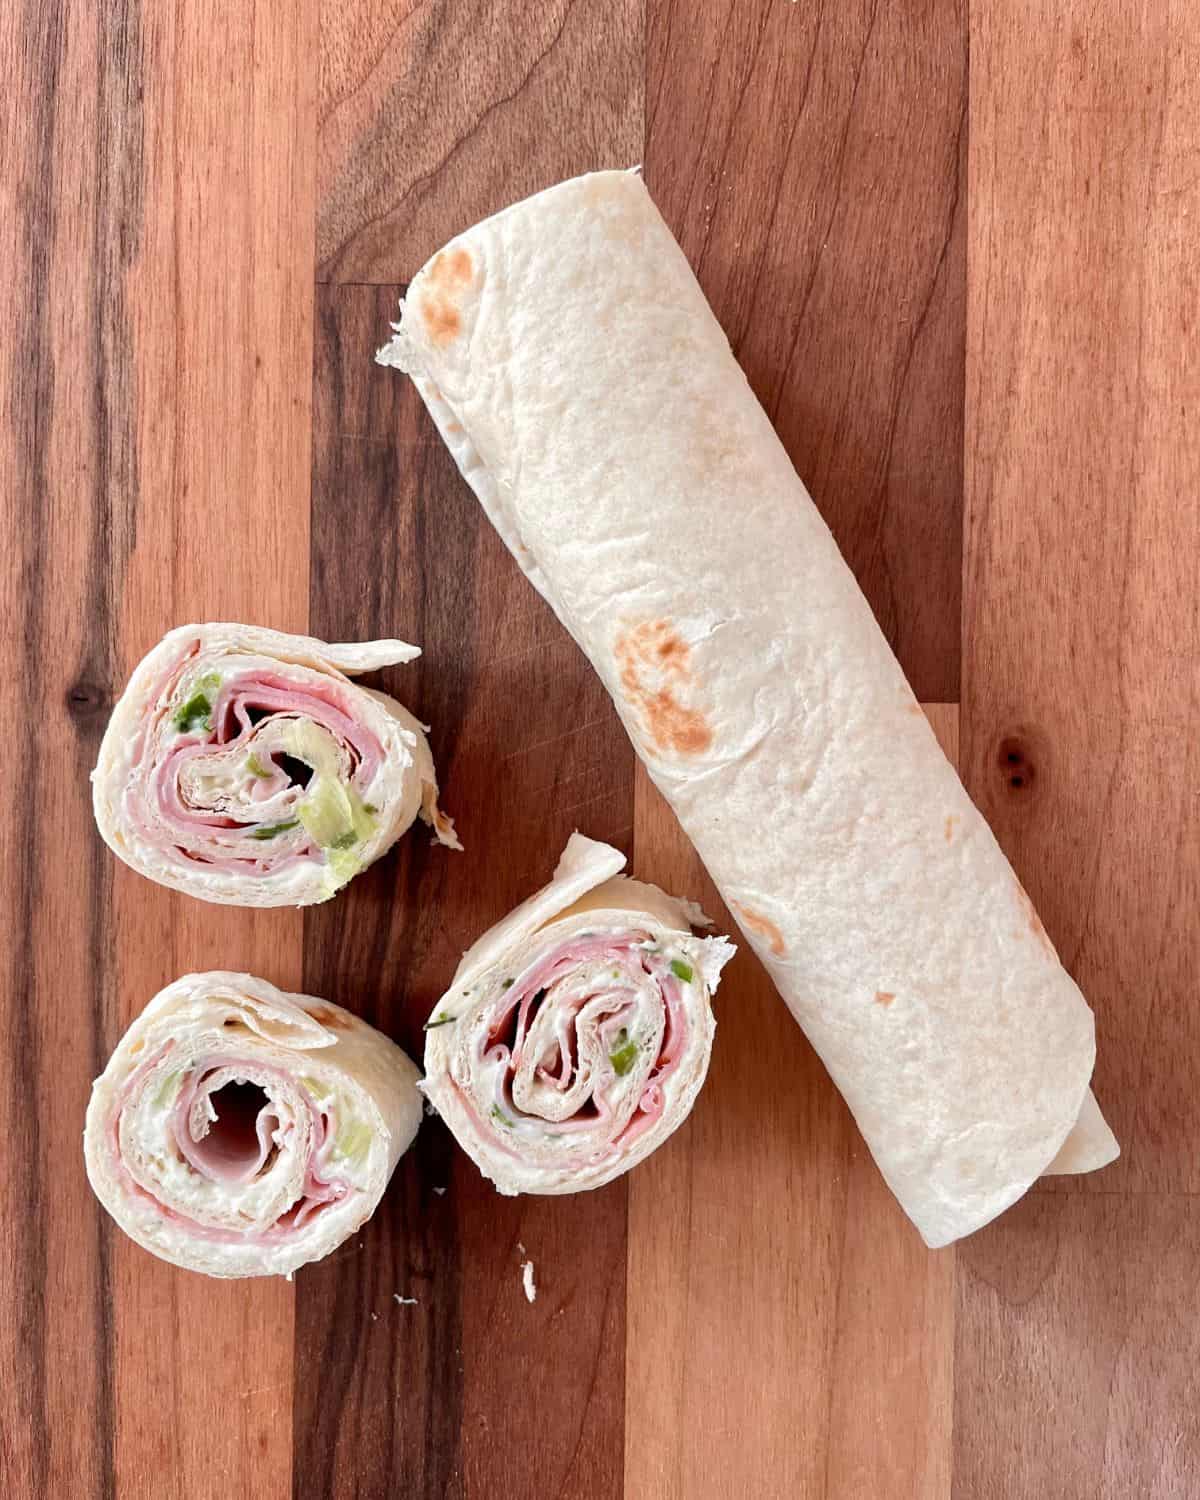
Step 6: Slice the pinwheel wraps into 1-inch thick slices, serve, and enjoy!
How to store pinwheel sandwiches
- Place cold pinwheel slices in an air-tight container in the refrigerator for 3-4 days. Pinwheels with wet ingredients, such as tomatoes, or ingredients that tend to wilt, such as lettuce, won't store for quite as long. These will only last in the refrigerator for about two days.
- Warm pinwheels can be stored the same way but will need to be reheated when you're ready to eat them again.
When to serve sandwich pinwheels
Serve these seriously addicting finger foods at parties, holidays, and events! They'll disappear in a snap at your next:
- Birthday party
- Christmas party - Make festive pinwheels using red (tomato) and green (spinach) wraps!
- Easter brunch
- Thanksgiving appetizer
- Valentine's Day party - Serve as an app using tomato wraps.
- Halloween party
- St. Patrick's Day - Serve as an app using spinach wraps.
- Summer holidays such as the 4th of July, Labor Day, and Memorial Day
- Super Bowl Sunday party
- Summer BBQ or cookout
- Beach and boat days
- School lunch and classroom parties
Food allergy substitutions
- Dairy-free: My favorite dairy-free cheese alternatives are Tofutti Cream Cheese, Kite Hill Almond Milk Cream Cheese, and Field Roast Chao Creamy Original Slices.
- Gluten-free: Swap out your wheat-based wraps for a gluten-free wrap made with ingredients like rice flour and potato flour. Some of my favorite brands are Mission Gluten Free Tortillas and Rudi's Gluten-Free Plain Tortillas.
- Low-carb: There are so many delicious, low-carb wraps to choose from! I love La Tortilla Factory, Mission, and Tumaro.
What to serve with deli pinwheels
Serve these cute roll-up sandwiches with side salads like Mediterranean Cucumber Tomato Salad, Summer Tortellini Salad, and Potato Salad (without eggs).
They complement soups well, too. My favorite soup and sandwich combo includes Dutch Oven Chicken Noodle Soup, Busy Day Soup, and Broccoli Zucchini Soup.
FAQs
Avoid soggy pinwheels by making the pinwheels fresh and serving them immediately. Wet, or soggy, pinwheels are usually a result of moist ingredients sitting for too long in the wrap.
Yes, pinwheels will stay fresh in the refrigerator for up to 4 days, depending on your ingredients.
Technically, yes, pinwheel sandwiches can be frozen. However, many fresh vegetables like Romaine lettuce, sliced tomatoes, and cucumbers do not freeze well. The texture of cream cheese also doesn't hold up well in the freezer. So it really depends on what you've added to your pinwheel sandwiches and whether or not they're freezer-friendly foods.
Pinwheel sandwiches are made with a variety of ingredients! Pinwheels are wrapped in tortilla wraps, sandwich bread, or pastry dough. They're filled with creamy fillings like chicken salad and cream cheese, and also deli meat, fresh veggies, and fresh fruit.
More sandwich recipes

If you tried this Pinwheel Sandwiches Recipe or any other recipe on my blog, please leave a 🌟 star rating and tell me how it went in the 📝 comments below. Thanks for visiting!
PrintHow to Make Pinwheel Sandwiches - The Ultimate Guide!

Pinwheel sandwiches (or wraps), are a simple lunch, appetizer and party snack. Kids and adults love these delicious one-bite, finger foods.
- Prep Time: 30 minutes to make
- Cook Time: 1 hour to chill
- Total Time: *
- Yield: Aprox. 24 pinwheel slices per recipe
- Category: lunch, appetizer, snack
- Method: Wrap
- Cuisine: American
Ingredients
Ham & Ranch Cream Cheese Pinwheel Wrap
- 8-ounce brick cream cheese
- 2 tablespoons ranch seasoning dip mix
- (4) 10-12 inch tortilla wraps
- 16 slices thin-cut Black Forest deli ham (about ½ pound)
- 4 tablespoons diced green onions
Salami & Pesto Cream Cheese Pinwheel Wrap
- 8 ounce brick cream cheese
- 2 tablespoons basil pesto
- (4) 10-12 inch tortilla wraps
- 24 thin slices Genoa salami (about ½ pound)
- 4 tablespoons diced sundried tomatoes
Instructions
Ham & Ranch Cream Cheese Pinwheel Wrap
- Soften the cream cheese in a bowl in the microwave for 30 seconds - 1 minute.
- Remove the cream cheese from the microwave and mix the ranch dip mix and green onions into the cream cheese until thoroughly combined.
- Start making your wraps. Place one wrap down onto your work surface. Evenly spread ¼ of the ranch cream cheese onto the wrap, getting all the way to the edges of the wrap.
- Layer 4 slices of ham evenly across the cream cheese wrap.
- Starting at the bottom edge of the wrap, tightly roll the wrap. Seal the ends of the wrap with the cream cheese that is spread onto your wrap. Set the wrap aside and repeat with the remaining 3 wraps.
- Wrap the pinwheel wraps tightly with plastic wrap and chill in the refrigerator for at least 1 hour. After chilling, remove the wraps from the fridge. Using a sharp knife, cut the wraps into 1-inch thick slices.
- Serve & enjoy!
Salami & Pesto Cream Cheese Pinwheel Wrap
- Soften the cream cheese in a bowl in the microwave for 30 seconds - 1 minute.
- Remove the cream cheese from the microwave and mix the basil pesto into the cream cheese until thoroughly combined.
- Start making your wraps. Place one wrap down onto your work surface. Evenly spread ¼ cup of the pesto cream cheese onto the wrap, getting all the way to the edges of the wrap.
- Layer 6 slices of salami evenly across the cream cheese wrap.
- Sprinkle 1 tablespoon diced sundried tomatoes evenly onto the salami.
- Starting at the bottom edge of the wrap, tightly roll the wrap. Seal the ends of the wrap with the cream cheese that is spread onto your wrap. Set the wrap aside and repeat steps 3-6 with the remaining 3 wraps.
- Wrap the 4 pinwheel wraps tightly with plastic wrap and chill in the refrigerator for at least 1 hour. After chilling, remove the wraps from the fridge. Using a sharp knife, cut the wraps into 1 inch thick slices.
- Serve & enjoy!
Notes
- When cutting the wraps, place them seam side down.
- If you are still struggling with keeping your pinwheels together, use some toothpicks!
- If you plan on packing your pinwheels in a cooler for the day, I suggest waiting to cut them. They will take up far less room in your cooler if you individually wrap them in plastic wrap instead of cutting them into bites and storing them in Tupperware.
- To make gluten free, swap out the wheat based wraps with a gluten free wrap.
- To make dairy free, simply use a non-dairy cream cheese.


Ciel says
The salami and pesto recipe was delicious, keeping them wrapped for the cooler and cutting them when you are ready was a great tip, and they tasted great snacking all day after making them early in the morning!
Jeri says
I love pinwheel sandwiches! I haven't had them in years, perfect for back-to-school lunches!
Lexa says
This is such a fun idea for a quick lunch! These ingredients are on my shopping list for next week's lunch 🙂
Kay says
Perfect picnic food for the family!
Freya says
So much fun to make and so popular!
Luca - Ruoka on valmis says
I love the very detailed step-by-step instructions, they are super helpful. And...the food is so delicious!
Agnieszka says
These are awesome for a party. My kids also love them and they don’t like regular sandwiches!